


Setup
If you are not living under a rock, you must have heard about the Gemini Nano, Gemini Pro and Gemini Ultra Large Language Models, developed by Google. The Gemini family of models are also the ones, which power Google Bard (Now Gemini).
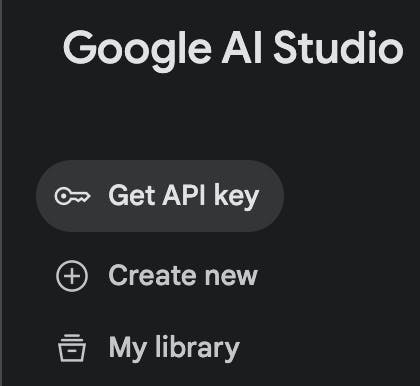
Gemini Pro is currently accessible through a REST API, the API key for which can be found on MakerSuite (Now Google AI Studio). To get the API Key, click the Get API Key button as shown here.
You will need a new flutter project. Once created, create a new class in lib/constants.dart (Note: this is not the best practice for storing API Keys for production apps. For securely storing API Keys, read this article):
class Constants{
  static String apiKey = "<Your API Key Here>";
}
Replace your API Key in this file. Next, add the gemini_flutter package to your pubspec.yaml file under the dependencies section: flutter_gemini: ^2.0.1
You will now need to initialize the Gemini API within the main() function of the app. Add the following code before calling the runApp() method:
WidgetsFlutterBinding.ensureInitialized();
Gemini.init(apiKey: Constants.apiKey);
Chat
Let's look at how we can chat with the model, and design an interface for it. First, we will need to create a variable to store the chat history of the user, in the home_page.dart file. We will also need a TextEditingController to retrieve TextField text, and a function _chat() which will accept the message by the user and fetch data from the API.
List<Content> _chatHistory = [];
var _chatController = TextEditingController();
final gemini = Gemini.instance;
bool _isLoading = false;
void _chat(String message) {
  setState(() {
    _chatHistory.add(
      Content(
        parts: [
          Parts(text: message),
        ],
        role: "user",
      ),
    );
    _isLoading = true;
  });
  gemini.chat(_chatHistory).then((value) {
    setState(() {
      _isLoading = false;
      _chatHistory.add(
        Content(
          parts: [
            Parts(text: value?.output ?? 'No response'
          ],
          role: "model",
        ),
      );
    });
  });
}
We will also need a User Interface, which will comprise of a Column widget in a containing an Expanded ListView containing the chat messages, a Row Containing a TextField and a send Button. Before going ahead, make sure to add the chat_bubbles: ^1.6.0 to the dependencies.
return Scaffold(
  body: Column(
    children: [
      Expanded(
        child: ListView.builder(
          itemCount: _chatHistory.length,
          itemBuilder: (context, index) {
            return Column(
              children: [
                BubbleSpecialThree(
                  text: _chatHistory[index].parts![0].text ?? "",
                  isSender: _chatHistory[index].role == "user",
                  color: _chatHistory[index].role == "user"
                      ? Colors.blue
                      : Colors.grey,
                ),
                _isLoading && index == _chatHistory.length - 1
                    ? const BubbleSpecialThree(
                        text: "Loading...",
                        isSender: false,
                        color: Colors.grey,
                      )
                    : const SizedBox(),
              ],
            );
          },
        ),
      ),
      Padding(
        padding: const EdgeInsets.all(16),
        child: Row(
          children: [
            Expanded(
              child: TextField(
                controller: _chatController,
                decoration: const InputDecoration(
                  border: OutlineInputBorder(
                    borderRadius: BorderRadius.all(
                      Radius.circular(10),
                    ),
                  ),
                  labelText: 'Message',
                ),
                onSubmitted: (value) {
                  _chat(value);
                  _chatController.clear();
                },
              ),
            ),
            IconButton(
              onPressed: () {
                _chat(_chatController.text);
                _chatController.clear();
              },
              icon: const Icon(Icons.send),
            ),
          ],
        ),
      ),
    ],
  ),
);
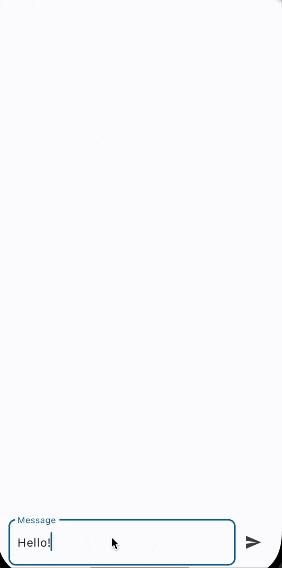
Here is a final result of the app:
Thank you for reading. Do leave a feedback, and any doubts, I'll try to answer as many as I can.